
Talking to Your Apps: The Cool Way with ChatGPT
Hey there! On our blog today, we're writing about something amazing called ChatGPT Custom Actions.
What is a GPT Action anyway?
GPT actions allow GPT to perform specific tasks within a conversation, like generating images or browsing files. For example, if asked to create an image of a sunset over the ocean, GPT can create a detailed picture based on that description.
What are custom actions then?
Custom actions enable GPT to perform specialized tasks defined by developers, such as accessing a particular database or processing custom data. For example, a custom action could check the weather by querying a weather API and return the forecast for a user's location.
They are already available for many 3rd party apps and web services so that you can interact with them through the GPT Store, but today we are focusing on custom built apps using both YOUR provided API schema and authentication provider.
Think about how you use apps with buttons and menus in a traditional way. Now, imagine if, instead of clicking around, you could just ask your app to do stuff like "organize my day" or "send an email" or "order a pizza" or "setup an environment on AWS". That's what we mean by custom actions – your app becomes a helpful buddy that listens and responds.
Today, this feature is available in the GPT store to subscribers, but I can't help thinking: could this be a form of evolution of software development? Will we one day only focus on defining essential rules and API specifications so that a specialized UI, such as a GPT, will create personalized experiences and capabilities around it, assuring safety at the same time?
Lets see a simple, but working example of this. I'll be using Rust because it is a language I'm currently experimenting with, but the same can be done with any other modern language.
Architecture
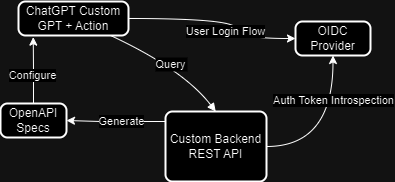
How it works in simple terms:
-
The Brain: Our app is built around ChatGPT, which is really good at talking to you and understanding what you need.
-
The Plans: We start with something called OpenAPI Specs. Think of it as a recipe that tells our app how to talk to our computer system in a way it understands.
-
The Workshop: Next, we have the Custom Backend REST API. This is like a workshop where all the tools to make our app work are kept.
-
The Security Guard: To make sure only the right people can use the app, we have an OIDC Provider. It's like a security guard that checks your ID before you come in.
-
The Checkpoint: When the security guard gives you a pass (we call this a token), our app checks it carefully to make sure it's the real deal. This is called Auth Token Introspection.
-
The Conversation: After you get the green light, you can start talking to our ChatGPT. You ask questions or give it tasks, and it uses the tools in the workshop to help you out.
Implementation
In this part we go over the details of the implementation. The full source code can be found on the neuro-rs github repository.
Configuration is loaded from environment using a .env file or injected environment variables. I've used a OnceCell so that it is statically available as a struct all over the application. We then initialize the keycloak (or OIDC depending on your setup) client. It is setup so that it can be used in multiple places, reusing the same client instance, initializing it just once.
use std::sync::Arc;
use config::Config;
use dotenvy::dotenv;
use once_cell::sync::Lazy;
use auth::get_keycloak;

pub static ENV_CONFIG: Lazy<Config> = Lazy::new(|| Config::init_from_env().unwrap());

#[tokio::main]
async fn main() {
    dotenv().expect(".env file not found");
    let _ = get_keycloak().await.expect("couldn't initialize keycloak");
    ...
}
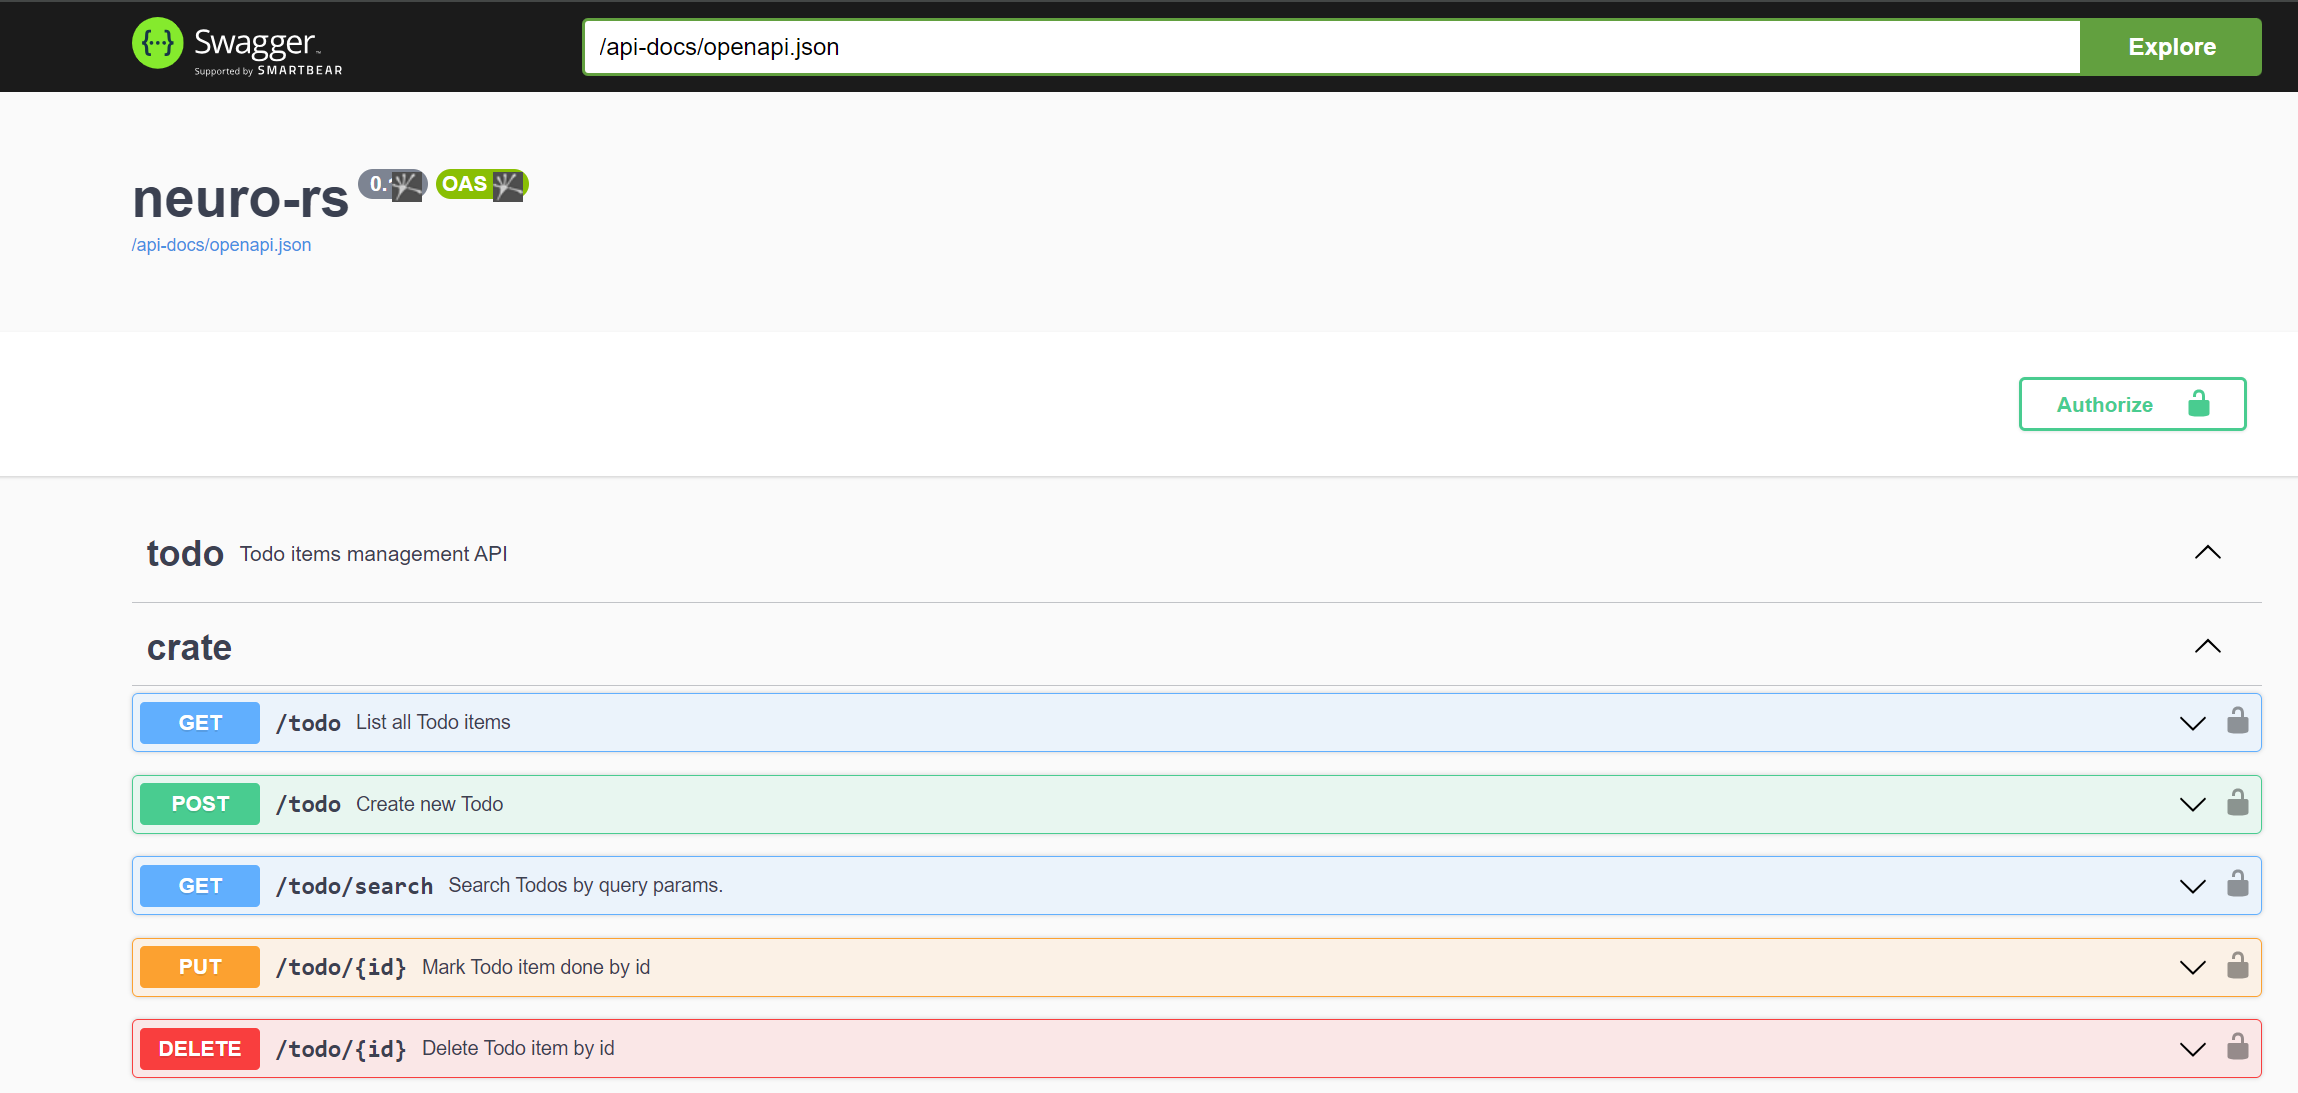
We are using Axum as web framework in Rust. Between the many choices available in Rust, this looked like a safe, simple and well-known one, with a good support for OpenAPI given by utoipa crate. Endpoints that are protected by authentication are being declared inside protected_router(), anything else is exposed.
let app = public_router()
    .merge(protected_router())
    .merge(SwaggerUi::new("/swagger-ui").url("/api-docs/openapi.json", todo::ApiDoc::openapi()))
    ...
    .layer(cors);
The Todo is like the hello-world of CRUD REST APIs. I got the implementation from a given example in the "utoipa" crate in order to bootstrap the prototype quickly.
#[derive(Serialize, Deserialize, ToSchema, Clone)]
pub(super) struct Todo {
    id: i32,
    value: String,
    done: bool,
}
Each function under todo.rs plays out a scene in our application's narrative. From listing todos (list_todos) to creating new ones (create_todo), each endpoint adds depth to our story, allowing users to interact with the world we've built.
#[utoipa::path(get, path = "/todo", responses((status = 200, description = "List all todos successfully", body = [Todo])))]
pub(super) async fn list_todos(State(store): State<Arc<Store>>) -> Json<Vec<Todo>> {
    ...
}

#[utoipa::path(post, path = "/todo", request_body = Todo, responses((status = 201, description = "Todo item created successfully", body = Todo)))]
pub(super) async fn create_todo(State(store): State<Arc<Store>>, Json(todo): Json<Todo>) -> impl IntoResponse {
    ...
}
Authorization in neuro-rs is done via a custom middleware in which a openidconnect client makes an introspection of the auth token that it finds in the header of the request.
pub(crate) async fn auth(req: Request, next: Next) -> Result<Response, StatusCode> {
    ...
    if authorize_current_user(auth_header).await {
        Ok(next.run(req).await)
    } else {
        Err(StatusCode::UNAUTHORIZED)
    }
}
The login workflow is covered automatically by GPT after setup. If you want to test your local instance you can use the swaggerUI endpoint that you find at runtime on /swagger-ui path, authenticating via the "Authorize" button on the right corner up of the page.
Now you can create your custom GPT:
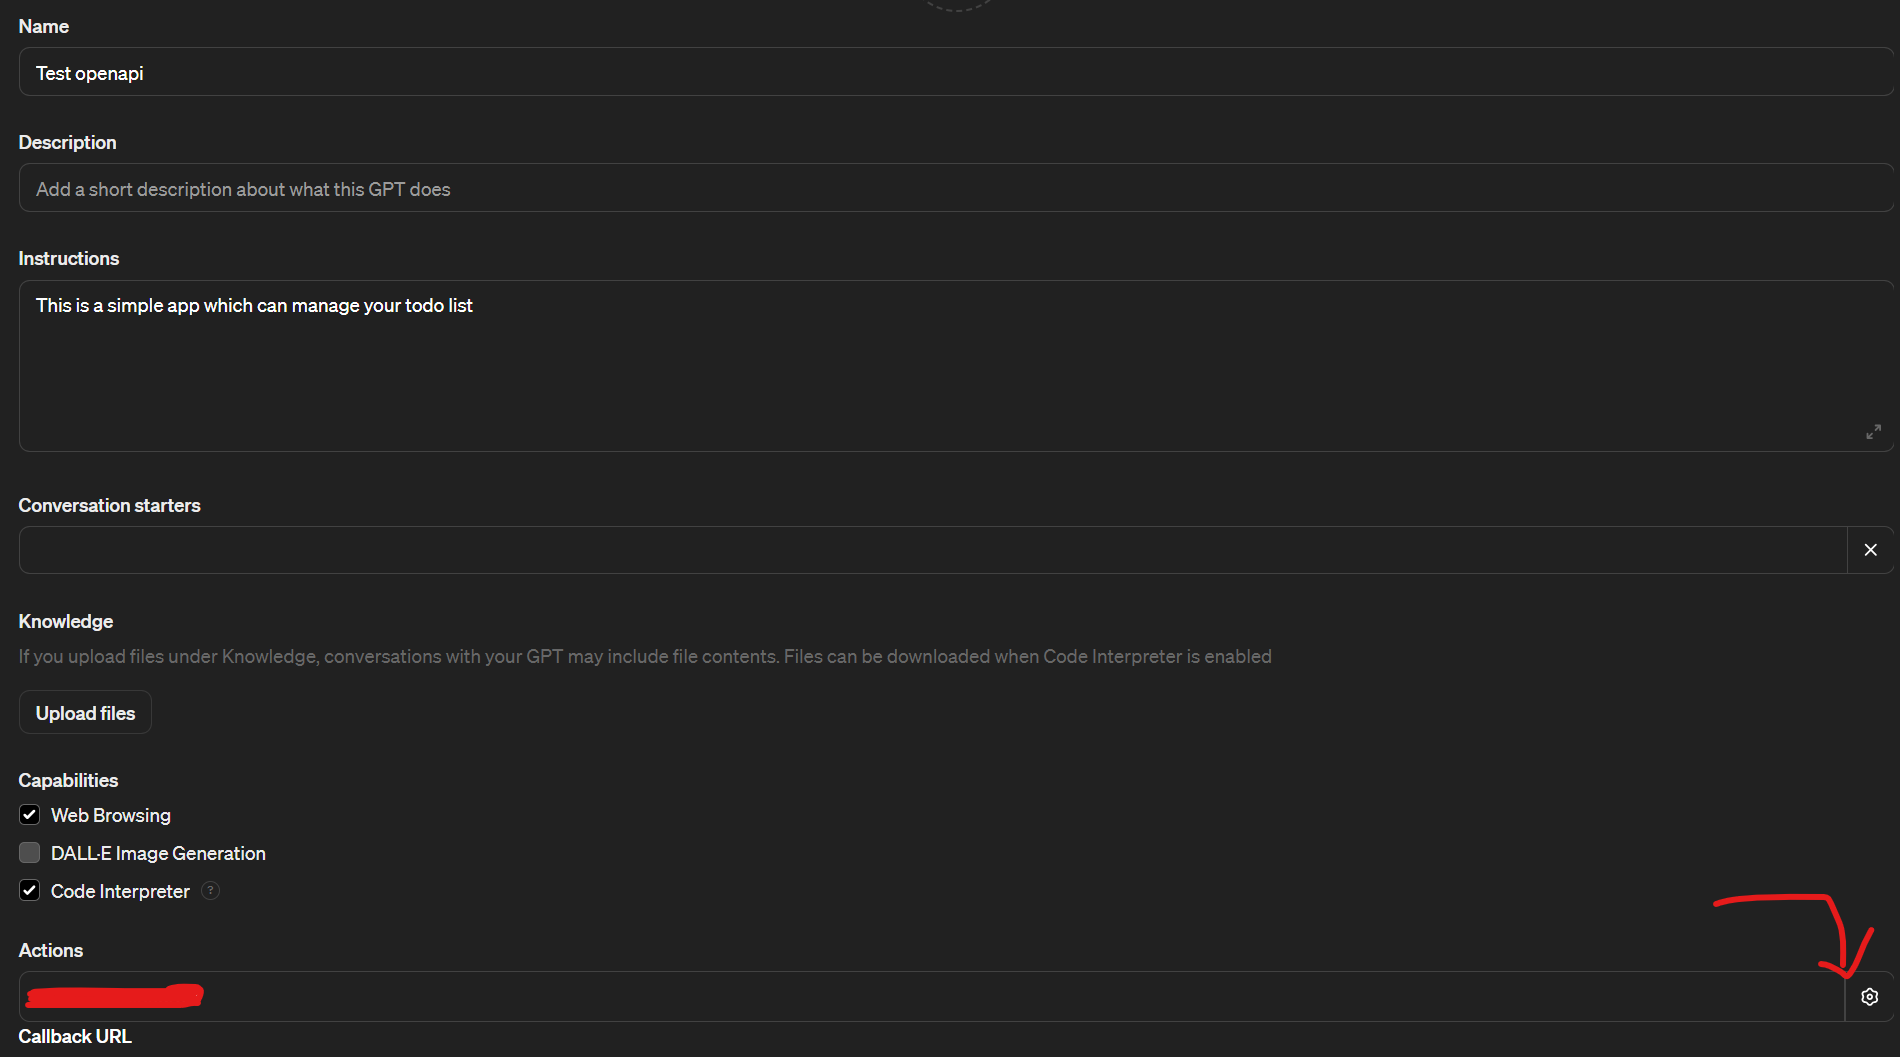
Allow it to access to a custom action where you set 1. the OpenAPI spec schema generate by your backend 2. the authentication method and setting, in our case Oauth with Keycloak.
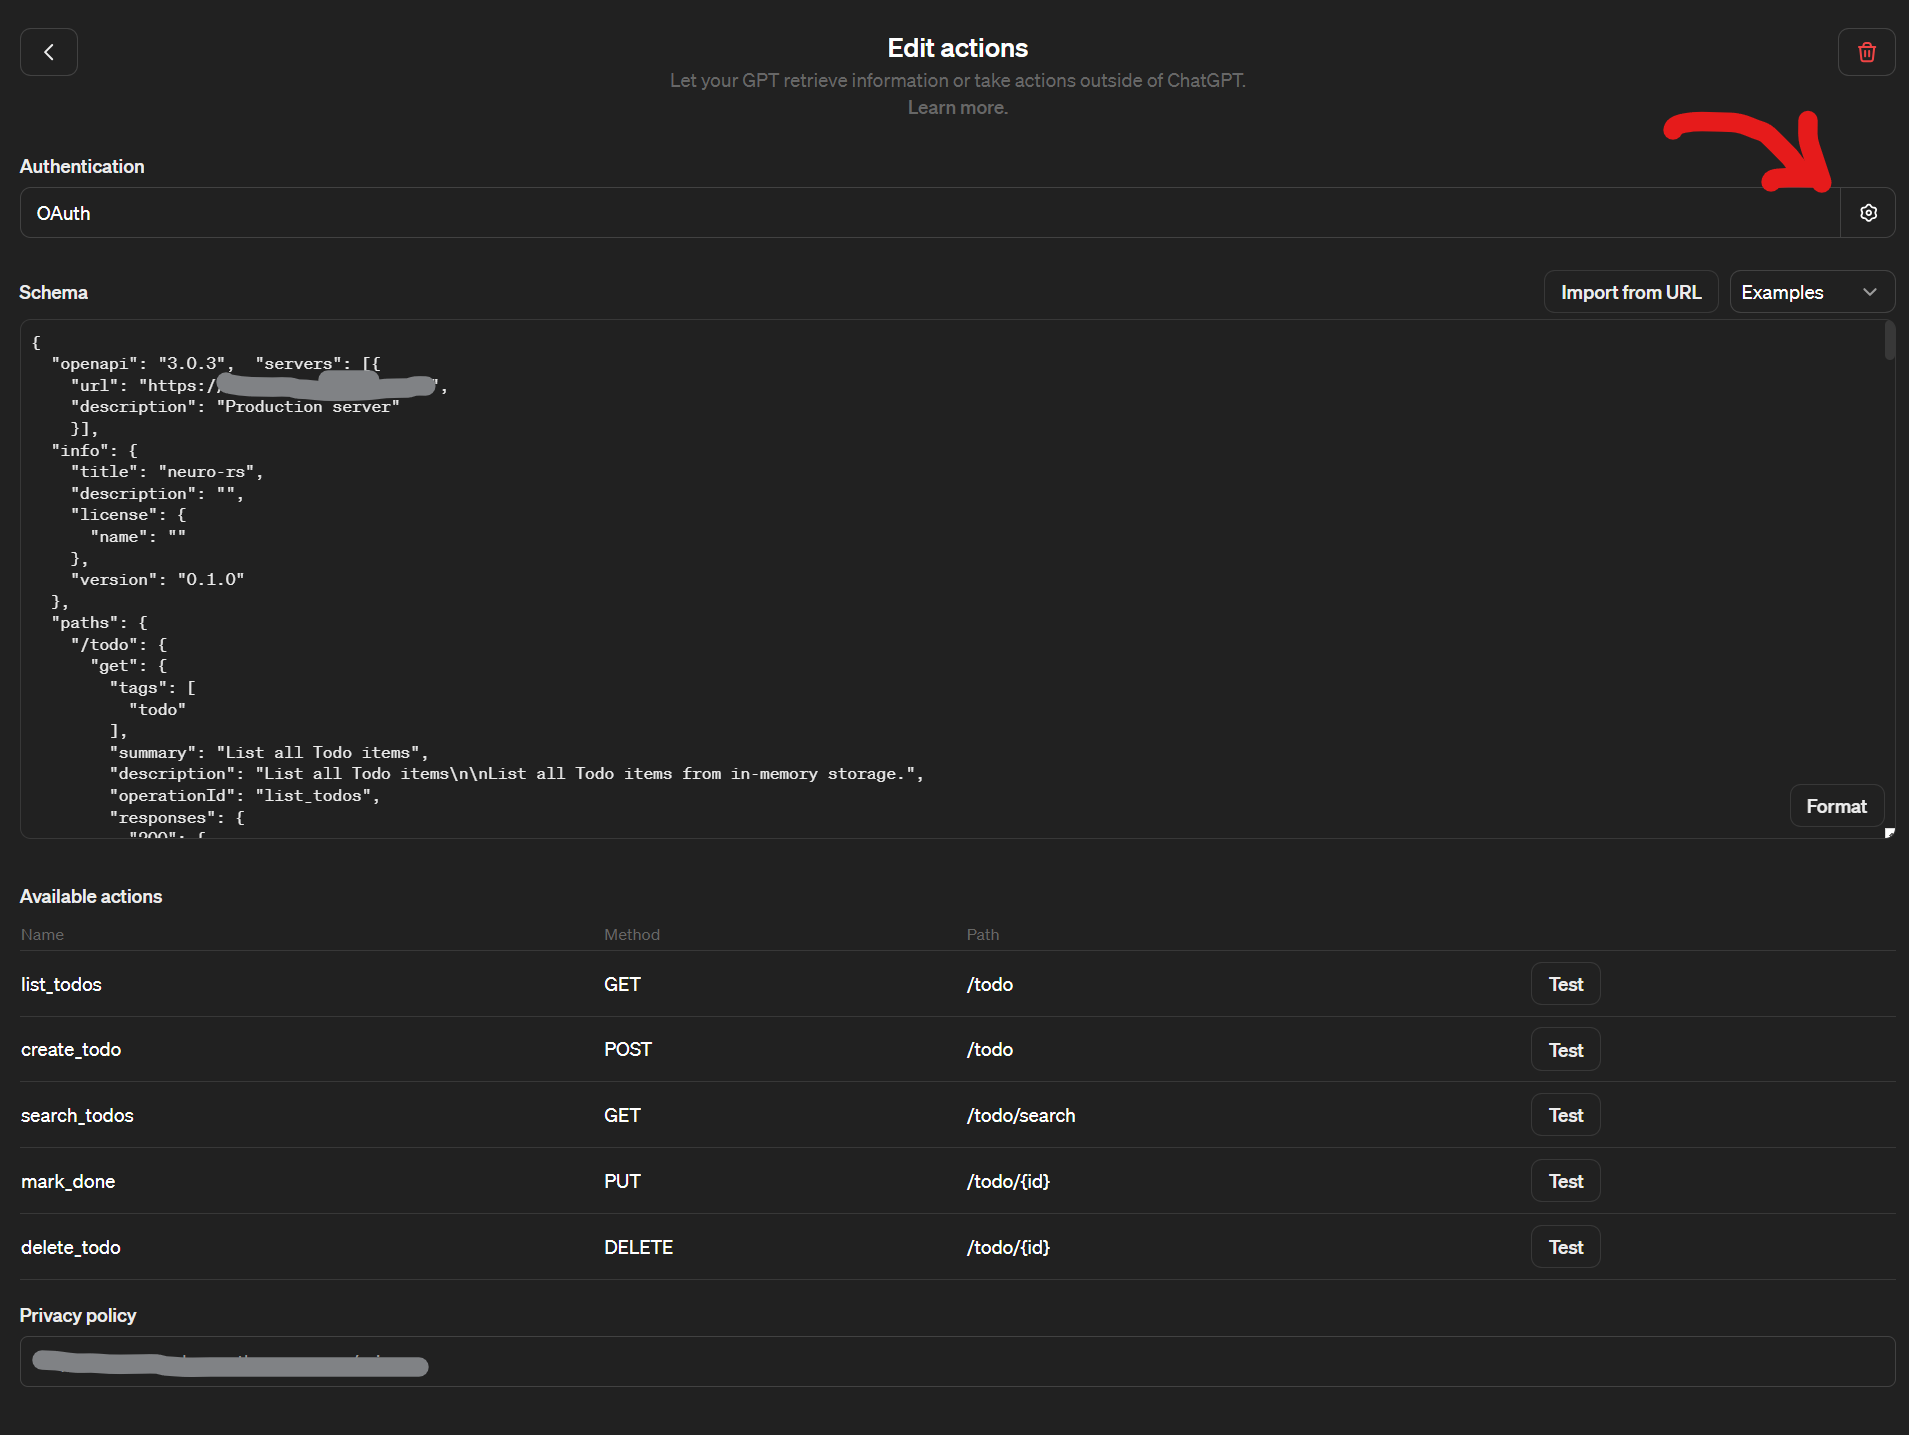
For a complete reference on the settings required on the OpenAI ChatGPT side, please refer to the official documentation.
The Result
Now that everything is set up, you can finally test how the GPT interacts with our API. In the example below, the following happens:
- We ask GPT to create 5 tasks for our weekly house-keeping.
- GPT understands that this task can be solved using one of its actions, so after evaluating what tasks it could create, it asks you to authenticate through a button
- You get redirected to a login page on your Keycloak instance
- After logging in, you are brought back to the GPT chat with an Auth Token
- The GPT automatically creates the Todo list calling the API with the auth token that it got from Keycloak
Isn't it cool? I'd love to hear your thoughts! Feel free to email me with your feedback or suggestions for future blog topics. One topic that is definitely in my Todo List is a 0$ a year Cloud Native host easily setup with infrastructure automation. Have fun!